WordPress Zero to Hero: Your Complete Roadmap [2026]
Welcome to the starting line. If you have been looking for a clear, step-by-step path to learn WordPress from scratch, this is it. I am not going to throw a random list of tips at you. Instead, I have built a complete WordPress zero to hero roadmap that takes you from absolute beginner to confident WordPress user in 2026.
Let me ask you something before we dive in. Have you ever opened the WordPress dashboard, stared at all those menu items on the left side, and felt completely lost? Do not worry. That feeling is normal. Every single person who uses WordPress felt that way on their first day. The difference between people who quit and people who become skilled is simple — they follow a structured plan. And that plan is exactly what I am giving you right now.
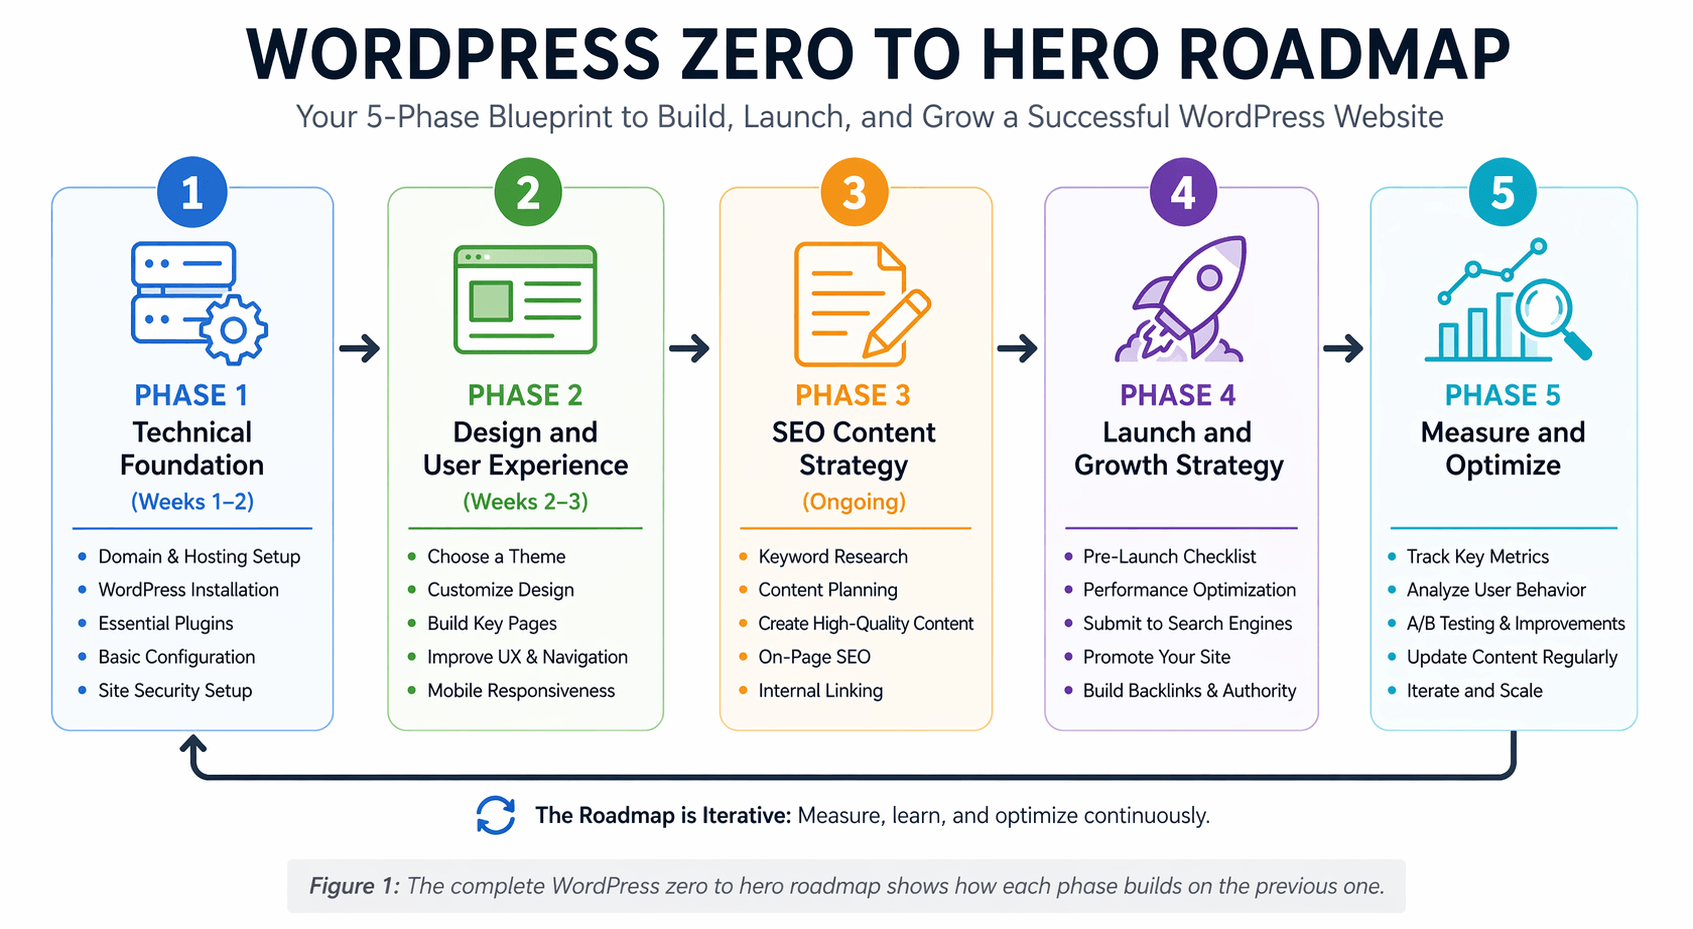
This roadmap is divided into five clear phases. Each phase builds on the last one. Phase 1 sets up your technical foundation. Phase 2 makes your site look great and work well for readers. Phase 3 teaches you how to get found in Google. Phase 4 covers launching and growing your audience. Phase 5 shows you how to measure results and keep improving. By the time you finish all five phases, you will have real, practical WordPress skills.
What you will learn in this guide: The complete 5-phase system for going from zero WordPress knowledge to building fast, secure, SEO-ready websites. This includes the exact plugin stack to use, the content structure to follow, the publishing schedule that works, and the metrics that actually matter for growth.
Phase 1: Technical Foundation (Weeks 1-2)
Phase 1Think of this phase as pouring the concrete for your house. If the foundation is weak, everything built on top of it will have problems. Cracks in the walls. Doors that do not close right. A website works the same way. If your hosting is slow, your security is weak, and your core settings are wrong, no amount of beautiful design or great content will fix those problems.
So in these first two weeks, we focus purely on getting the technical basics right. This is not the exciting part. I know that. But it is the most important part. Take your time here. When these fundamentals are solid, everything after this becomes much easier and much more fun.
1.1 Hosting and Domain Optimization
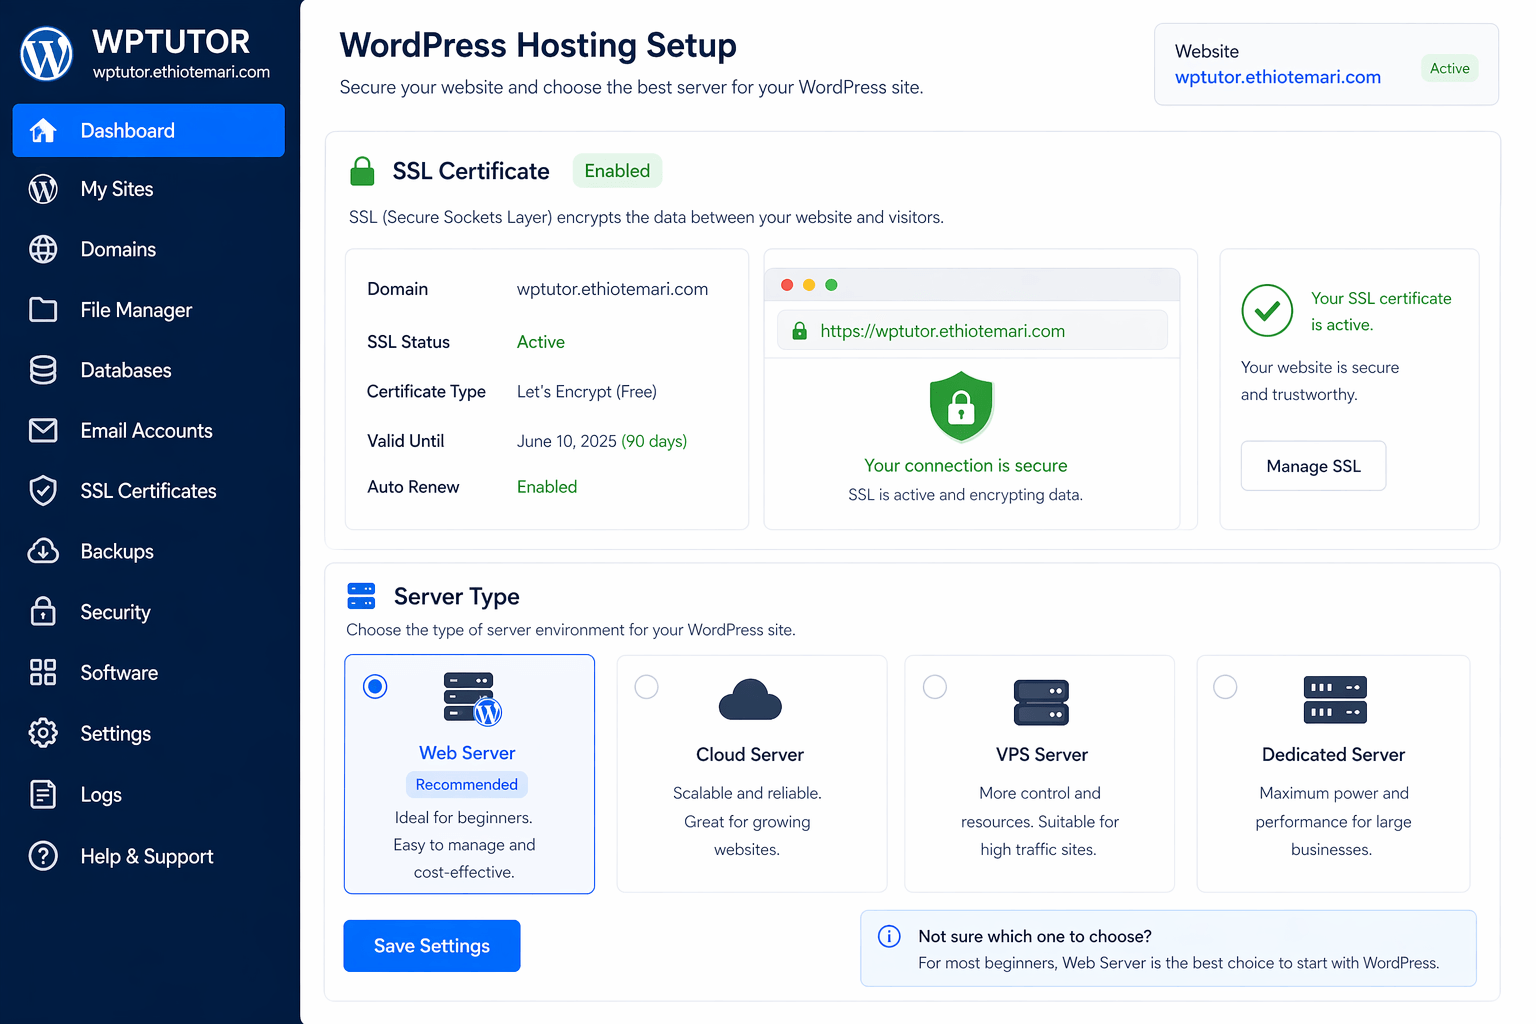
Your domain name is your website address on the internet. Your hosting is the server where your website files actually live. Both of these decisions affect your site speed, your security, and even your Google rankings. So you want to get them right from day one.
Let me explain why hosting matters so much. When someone visits your website, their browser sends a request to your server. The server then sends back all the files needed to display the page — HTML, CSS, JavaScript, images. If your server is slow, this process takes longer. And Google has made it very clear that page speed is a ranking factor. A faster site ranks higher than a slower site, all other things being equal.
That is why I recommend choosing hosting that uses LiteSpeed servers or SSD storage. LiteSpeed is a web server technology that is significantly faster than the older Apache servers that many cheap hosting companies still use. SSD storage is faster than old-style HDD storage. Together, these technologies can cut your page load time in half compared to budget hosting on older servers.
You also need a free SSL certificate. SSL stands for Secure Sockets Layer. It encrypts the connection between your visitor’s browser and your server. When SSL is active, your website URL shows https:// instead of http://, and browsers display a small lock icon next to the URL. Google has confirmed that HTTPS is a ranking signal. More importantly, without SSL, browsers like Chrome will show a “Not Secure” warning to your visitors. That destroys trust immediately. Most good hosting companies now include a free SSL certificate through Let’s Encrypt. Make sure it is enabled and that your site forces all traffic to use HTTPS.
Another non-negotiable is automatic daily backups. I need you to understand something here. Your website data is fragile. A plugin update can break your site. A hacker can deface your pages. You can accidentally delete an important post. Without backups, any of these events could mean starting over from scratch. With backups, you can restore your entire site to how it was yesterday in about five minutes. Set up UpdraftPlus (a free backup plugin) and configure it to run daily, storing backups in a cloud location like Google Drive or Dropbox. Do this before you write a single post.
Common beginner mistake: Many people pick the cheapest hosting they can find without checking what kind of servers the company uses. A $1/month hosting plan on slow, overloaded servers will hurt your site more than a $5/month plan on fast servers. The difference in cost is tiny. The difference in performance is huge. Choose quality hosting from the start.
1.2 WordPress Core Setup
Once WordPress is installed on your hosting, there are several core settings you need to change right away. These are not optional tweaks. They directly affect how search engines read your site and how your URLs appear to visitors.
First, update WordPress to the latest version. Always run the latest version. Every update includes security patches that fix known vulnerabilities. Running an old version of WordPress is one of the easiest ways to get hacked because hackers publicly share the vulnerabilities of old versions. When you see that update notification in your dashboard, do not ignore it. Back up your site first (that is why we set up backups), then update.
Second, set your permalinks to /%postname%/. This is critical for SEO and I want to make sure you understand why. Permalinks are the URL structure for your posts and pages. By default, WordPress uses a structure that looks like this: yoursite.com/?p=123. That URL tells Google absolutely nothing about what the page is about. The number 123 could be anything.
Now compare that to this: yoursite.com/how-to-install-wordpress. This URL clearly describes the content of the page. Google uses words in URLs as a small ranking signal. Humans reading the URL in search results can see what the page is about before clicking. This improves your click-through rate. To make this change, go to Settings, then Permalinks in your dashboard, and select the “Post Name” option. Click Save. Done.
Third, disable the default “Uncategorized” category. When you create a new post without selecting a category, WordPress automatically assigns it to “Uncategorized.” This is bad for two reasons. For visitors, seeing “Uncategorized” on a post makes your site look disorganized and unprofessional. For SEO, it means Google sees a bunch of posts lumped into a generic category instead of properly organized topics. Create real categories that match your content topics, then either delete “Uncategorized” or rename it to something more useful like “General.”
Other important settings to configure early include your discussion settings (decide whether comments require approval, whether people need to leave a name and email, and how comment threading works), your timezone setting (so your post dates and scheduled content publish at the correct time), and your language preference (WordPress is available in many languages and the admin interface can be set to your preferred language).
WordPress Core Setup Checklist:
✓ Update WordPress to latest version
✓ Set permalinks to: /%postname%/
✓ Disable default "Uncategorized" category
✓ Configure discussion settings (manage comments)
✓ Set timezone and language preferences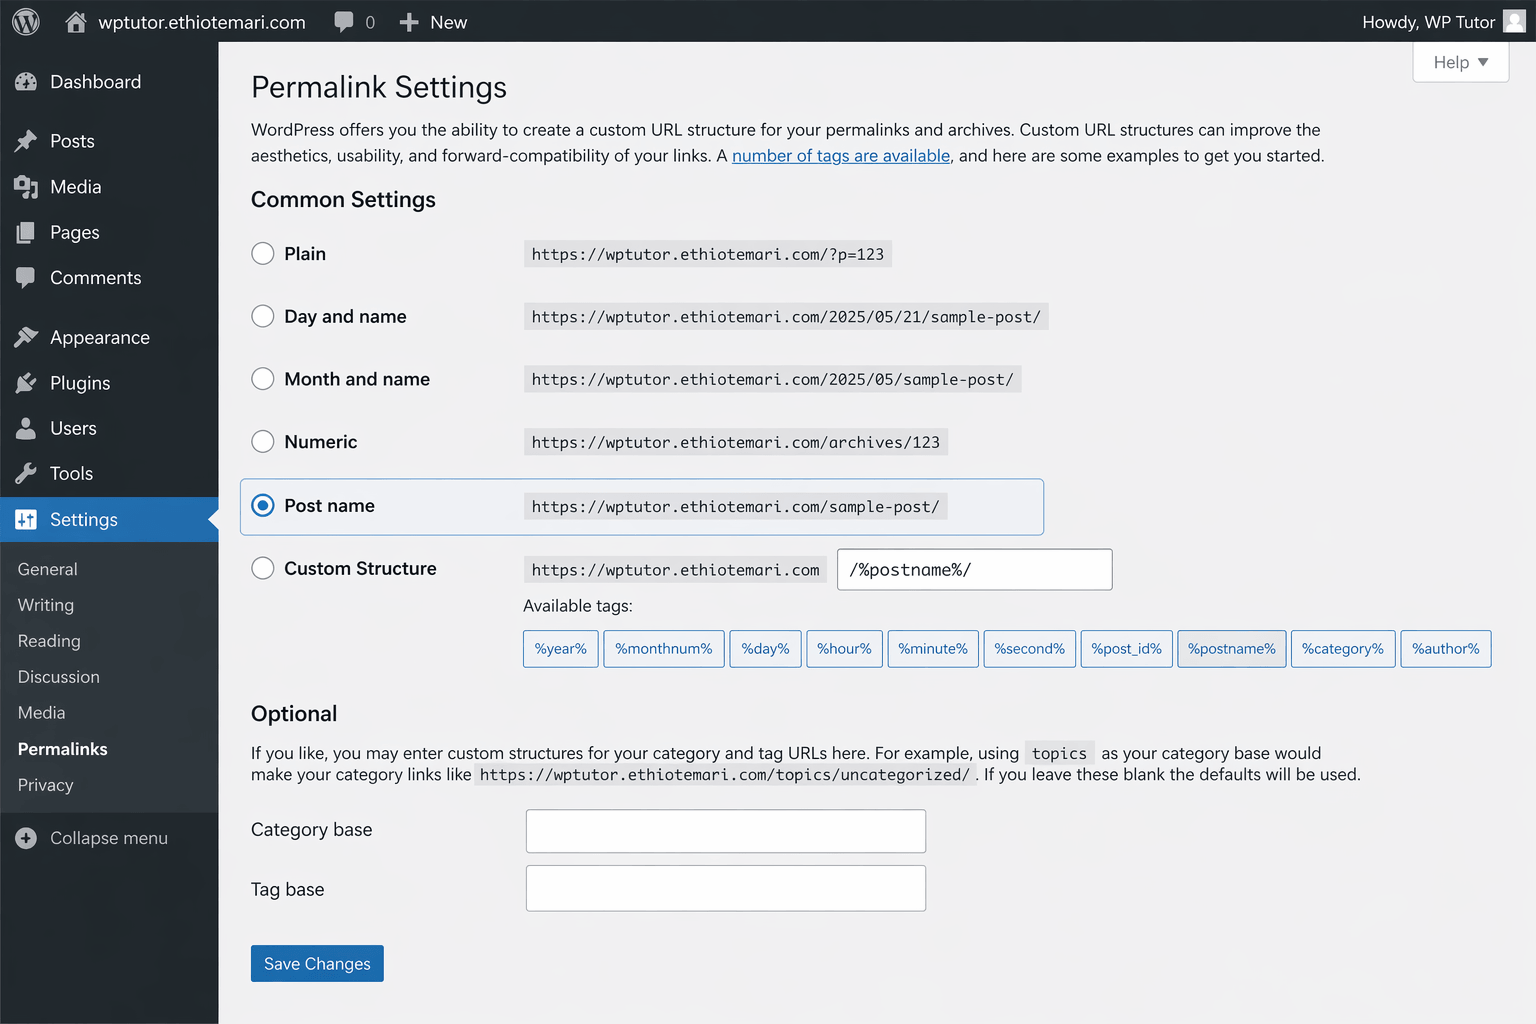
1.3 Essential Plugin Stack (Keep It Lean)
Plugins add features to WordPress. But here is a critical concept that most beginners do not understand: every plugin you install adds code to your site. More code means more files the browser has to download. More files means slower page loading. Slower loading means lower Google rankings and visitors leaving your site before it finishes loading. More plugins also means more chances for conflicts between plugins, which can break your site.
So the rule with plugins is simple: install only what you truly need, and keep the total number as low as possible. I have seen beginners install 30, 40, even 50 plugins because each one seemed useful. Their sites were painfully slow and constantly breaking. Do not do that.
Start with these six essential plugins. Each one solves a specific problem, and together they cover the most important needs of a WordPress site.
| Plugin | Purpose | Why You Need It | Free/Paid |
|---|---|---|---|
| Rank Math or Yoast SEO | On-page SEO optimization | Helps you structure content for search intent. Gives real-time SEO feedback while you write. Generates XML sitemaps automatically. | Free + Pro |
| LiteSpeed Cache or WP Rocket | Speed optimization | Critical for Core Web Vitals and rankings. Creates cached copies of your pages so the server does not have to rebuild them for every visitor. | Free + Pro |
| Smush or Imagify | Image compression | Tutorial sites use many screenshots. This compresses image file sizes without losing visible quality, keeping pages fast. | Free + Pro |
| UpdraftPlus | Automated backups | Scheduled daily backups stored in the cloud. If anything goes wrong, you can restore your entire site in minutes. | Free + Pro |
| Table of Contents Plus | Auto TOC generation | Automatically creates a clickable table of contents for long posts. Improves user experience and helps SEO with jump links. | Free |
| Schema Pro or Rank Math Schema | Structured data markup | Adds schema markup so Google can display rich snippets like star ratings, how-to steps, and FAQ dropdowns in search results. | Free + Pro |
Pro Tip: Avoid installing 30+ plugins. Fewer plugins mean fewer conflicts and a faster site. If a plugin does not serve a clear, specific purpose, do not install it. You can always add it later if you discover a real need for it.
Let me ask you a question here. Can you explain what each of these six plugins does in your own words? If not, go back and read the “Why You Need It” column again. Understanding why you need each plugin is more important than just installing them. When you understand the purpose, you will make better decisions about plugins in the future instead of just installing everything that sounds cool.
Phase 2: Design and User Experience (Weeks 2-3)
Phase 2Now we get to the fun part. Your technical foundation is solid. Your site is fast, secure, and properly configured. Now it is time to make it look good and feel easy to use. But I need you to hold onto one important idea throughout this entire phase.
For a tutorial blog, design is not about looking fancy. Design is about helping people learn faster.
Every design choice you make should answer one question: does this help my reader understand the content better? If the answer is no, simplify it or remove it entirely. A clean, simple design that helps people learn will always outperform a beautiful design that confuses people. This mindset will keep you from making the most common design mistakes that beginners make.
2.1 Theme Selection for Tutorial Blogs
Your WordPress theme controls how your site looks and functions. It determines the layout of your pages, the style of your headings, the position of your sidebar, the colors, the fonts, and dozens of other visual elements. Choosing the right theme is one of the most important design decisions you will make.
For a tutorial blog, you specifically need a lightweight, block-ready theme. Let me explain both of those terms because they matter a lot.
“Lightweight” means the theme does not load unnecessary code. Some themes include hundreds of features, sliders, page builder integrations, and design options that you will never use. All of that extra code gets loaded on every page of your site, slowing it down. A lightweight theme loads only the essential code needed for a clean, fast website. This directly improves your Core Web Vitals scores, which directly improves your Google rankings.
“Block-ready” means the theme is designed to work well with the WordPress block editor (also called Gutenberg). The block editor is the default content editor in WordPress. Instead of one big text box, you build your content using individual blocks — paragraph blocks, heading blocks, image blocks, column blocks, and more. A block-ready theme has styles built in that make these blocks look good without you needing to add custom CSS for basic layouts.
I recommend three specific themes for tutorial blogs, and I want you to understand the strengths of each one.
Astra is probably the most popular lightweight theme right now. It is incredibly fast — the base theme loads in under 50 kilobytes, which is remarkably small. It works with all major page builders but also looks great with just the block editor. The free version includes a header and footer builder, which is a feature many themes charge money for. Astra also has a large library of starter templates you can import to get a professional design with a few clicks.
Kadence is very similar to Astra in speed and flexibility, but it has one advantage that matters a lot for tutorial sites: it includes its own set of advanced Gutenberg blocks for free. These blocks let you create things like icon lists, info boxes, accordion sections, and table of contents — all of which are extremely useful for educational content. You do not need to install a separate blocks plugin when you use Kadence.
GeneratePress is known for having some of the cleanest, most minimal code of any WordPress theme. The entire theme is under 30 kilobytes. It takes a different approach than Astra and Kadence — instead of having lots of built-in features, it stays extremely minimal and lets you add features only when you need them through its free plugin ecosystem. This appeals to people who want maximum control over exactly what code runs on their site.
What should you avoid? Heavy multipurpose themes that try to do everything. Themes like older versions of Divi, Avada, or Enfold often load 300-500 kilobytes or more of CSS and JavaScript just for the theme alone. That is 10 times more than Astra or GeneratePress. These themes might look impressive in their demo showcases, but in real-world use, they tend to slow sites down significantly. For a tutorial blog where content is the most important thing, a fast, clean theme always wins over a heavy, feature-packed one.

2.2 Essential Page Structure
Having a good theme is not enough. You also need to organize your site’s pages and content in a way that makes sense to visitors. Think of your site structure like the layout of a school. If a new student walks in and there are no signs, no room numbers, and no map, they will feel lost and might leave. Your website works the same way. Clear structure helps visitors find what they need and helps search engines understand how your content is organized.
Your Homepage
Your homepage is the front door of your website. It should welcome visitors and immediately guide them to the right starting point. A good tutorial blog homepage includes four key elements. First, a hero section at the top with a clear message like “Learn WordPress Step-by-Step” and a brief description of who the site is for. Second, featured tutorial categories so visitors can browse by topic. Third, a learning pathway that shows the progression from beginner to intermediate to advanced, so new visitors know exactly where to start. Fourth, an email opt-in where visitors can subscribe to receive tutorials directly in their inbox.
Your Tutorial Categories
Categories are how you group related tutorials together. They are like departments in a school — math, science, history. For a zero to hero learning path, I recommend this specific category structure because it matches the natural learning progression:
📁 Tutorial Categories
├── ⚪ Zero Level: "WordPress Basics"
│   └── For absolute beginners, zero prior knowledge assumed
├── ⬛ Hero Path: "Theme Development", "SEO Mastery"
│   └── For intermediate to advanced learners building real skills
├── 🔵 Tools: "Plugin Reviews", "Hosting Guides"
│   └── For readers looking for specific tool recommendations
└── 🟢 Projects: "Build a Blog in 1 Hour"
    └── For readers who want to apply what they learned hands-on
This structure does two important things. For visitors, it creates a clear path — they start at Zero Level, move to Hero Path when ready, explore Tools as needed, and apply skills in Projects. For Google, it creates a logical content hierarchy that helps the search engine understand your site’s topical structure, which is a key part of building topical authority.
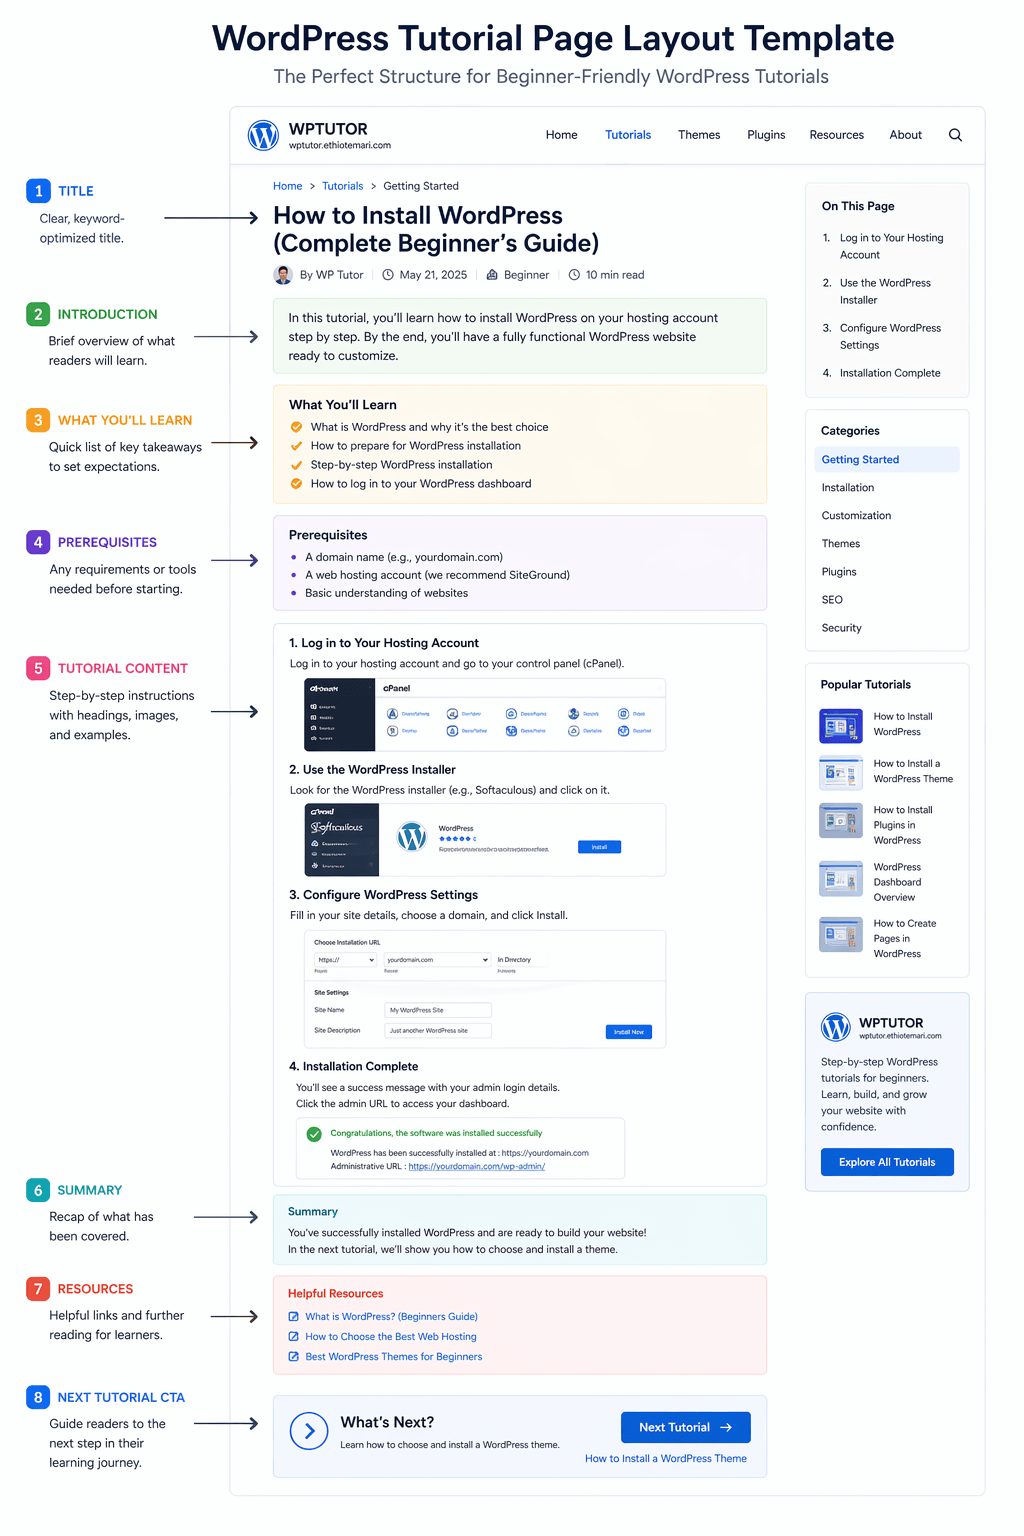
Your Single Tutorial Template
This might be the single most important design decision you make for your tutorial blog. Every tutorial on your site should follow the same consistent structure. Not because it looks nice (though it does), but because consistency builds trust and reduces cognitive load. When a reader finishes one of your tutorials and starts another, they already know where to find the prerequisites, where the steps begin, and where to find the next tutorial. They do not have to re-learn your layout each time.
📁 Single Tutorial Template
├── Clear H1 title with target keyword
├── Estimated read time + difficulty level badge
├── Table of Contents (jump links)
├── Step-by-step numbered sections (H2/H3)
├── Screenshot/gallery blocks with alt text
├── Code snippets with syntax highlighting
├── "What You Will Learn" box at top
└── "Next Tutorial" CTA at bottom
Let me highlight something important here. Notice how this template includes both learning aids (table of contents, “what you will learn” box, difficulty badge) and SEO elements (keyword in H1, proper heading hierarchy with H2/H3, alt text on screenshots)? That overlap is not accidental. When you design for learners, you are almost always designing for search engines too. A good table of contents reduces bounce rate because readers can jump to the section they need. Lower bounce rate signals to Google that your content is useful. The two goals support each other.
2.3 Mobile-First Design Checklist
More than half of all web traffic worldwide comes from mobile devices. In some regions, mobile traffic is over 70%. If your tutorials do not work well on phones, you are losing the majority of your potential audience before they even read your first paragraph. But “working on mobile” means more than just not breaking. Let me explain what proper mobile design looks like for a tutorial site.
Test on real mobile devices, not just browser simulators. Chrome DevTools has a mobile preview mode, and it is useful for quick checks. But real phones have different screen sizes, different touch behaviors, and different performance characteristics. A tutorial that looks fine in Chrome’s mobile simulator might have buttons too small to tap on an actual phone, or code blocks that do not scroll smoothly on a real touchscreen. Test on at least one real phone before publishing.
Use responsive image sizes with srcset. The srcset attribute tells the browser: “Here are three versions of this image — a small one for phones, a medium one for tablets, and a large one for desktops. Choose the right size based on the screen width.” This saves bandwidth on mobile (the browser downloads a smaller file instead of a huge desktop image) and speeds up loading. Many caching plugins can handle this automatically, or your theme might include this feature.
Ensure code blocks are horizontally scrollable on small screens. This is a specific issue for tutorial sites that most general design guides do not cover. Lines of code can be very long. On a phone screen, that long line will overflow the container and either break your layout or get cut off. The code block container needs overflow-x: auto so users can swipe horizontally to see the full line of code. Test this carefully because it is a common problem on tutorial sites.
Use a minimum font size of 16px for body text. Anything smaller is hard to read on phones without pinching and zooming. For tutorial content where readability is critical, many sites use 17px or even 18px. The extra size makes a real difference in how long people stay on your page, especially on mobile.
- Test all tutorials on real mobile devices — not just browser simulators
- Use responsive image sizes (srcset) — serve smaller images on phone screens
- Ensure code blocks are scrollable horizontally — prevent layout breaking
- Font size minimum of 16px for body text — 17-18px is even better for tutorials
Phase 3: SEO Content Strategy (Ongoing)
Phase 3Here is a question for you. What is the point of building a beautiful, fast website if nobody can find it? That is exactly the problem Phase 3 solves. Your site is technically solid and visually optimized. Now you need to make sure search engines can find it, understand it, and show it to people who are searching for what you teach.
But let me be very clear about something right up front. SEO for tutorial blogs is not about tricks or hacks. It is not about stuffing keywords into your text until it sounds weird. It is not about buying backlinks from shady services. Google’s algorithms in 2026 are sophisticated. They are designed to reward the most helpful, accurate, well-structured answer to each search query. Your job is to be that answer. When you approach SEO with that mindset, everything else falls into place naturally.
3.1 Keyword Research Framework
Keyword research means finding out what words and phrases people type into Google when they are looking for the information you want to teach. This is not about guessing. This is about using data to make smart decisions about what content to create.
For each tutorial you write, I want you to target three types of keywords. Think of them as three layers of the same topic.
The first layer is your primary keyword. This is the main phrase that best describes what your tutorial covers. For example, “how to install wordpress locally.” This keyword goes in your H1 title, your URL slug, your meta title, and naturally in your first paragraph. It is the main focus of the entire page.
The second layer is your secondary keywords. These are related phrases that mean the same thing but use different words. For example, “wordpress localhost setup” and “xampp wordpress tutorial.” These go naturally into your H2 and H3 headings and in your body text. They help Google understand that your page is relevant to multiple related searches, not just one exact phrase.
The third layer is your long-tail keywords. These are very specific phrases that have lower search volume but much higher intent. For example, “install wordpress on windows 11 step by step.” Long-tail keywords are easier to rank for because fewer sites target them specifically. They also bring more qualified traffic — someone searching for that specific phrase is very likely to follow your tutorial all the way through because you are answering their exact question.
Where do you find these keywords without spending money on expensive tools? Free tools like Google Keyword Planner, AnswerThePublic, and Ubersuggest give you plenty of keyword ideas. Type your broad topic into these tools and look at the related searches, questions, and phrase suggestions that appear. Pay special attention to the questions people ask — questions like “how do I” or “why does my” often make excellent tutorial topics because they show real problems that real people need solved.
Keyword Research Example for One Tutorial:
🎯 Primary:   "how to install wordpress locally"
🎯 Secondary: "wordpress localhost setup"
              "xampp wordpress tutorial"
🎯 Long-tail: "install wordpress on windows 11 step by step"
              "how to set up local wordpress for testing"
Why long-tail keywords matter for beginners: A phrase like “wordpress tutorial” has millions of competing pages. You will not rank for it anytime soon. But a phrase like “how to change font size in wordpress block editor 2026” has much less competition. Target these specific phrases first. Build up your authority on narrow topics. Then go after bigger keywords over time as your site gains trust.
3.2 Tutorial Content Template (SEO-Optimized)
Every tutorial you publish should follow this specific structure. I have refined this template over time to combine good teaching practices with SEO best practices. The key insight is that these two goals are not in conflict. A well-structured tutorial is both easy to learn from and well-optimized for search engines.
The H1 title should include your primary keyword and clearly state the outcome the reader will achieve. Use this format: “How to [Achieve Result] in WordPress: Step-by-Step Guide [Year].” The year helps your click-through rate because people scanning search results prefer recent content. The “How to” prefix matches the way most people phrase their searches. The “Step-by-Step Guide” suffix sets expectations about the format.
The meta description should be between 150 and 160 characters. It needs to include your keyword, describe what the tutorial covers, and end with a reason to click. Think of the meta description as a short advertisement for your page. When someone sees your result in Google, the meta description is often the deciding factor in whether they click your result or the one below it.
The “What You Will Learn” section goes right after your introduction. This serves two purposes. For the reader, it sets clear expectations — they know exactly what they will gain by reading the full tutorial. For SEO, these bullet points often get pulled into Google’s featured snippets, which are the answer boxes that appear above regular search results. Getting a featured snippet can dramatically increase your click-through rate.
The prerequisites section tells readers what they need before starting. This is important for teaching because it prevents frustration — people know upfront if they are ready. It is important for SEO because it creates natural internal linking opportunities when you link to prerequisite tutorials. “Before starting this tutorial, make sure you have completed [link to previous tutorial].”
The step-by-step instructions are the core content. Use clear H2 headings for each major step and H3 headings for sub-steps. Include screenshots with descriptive alt text. Add code snippets with syntax highlighting where relevant. Each step should be actionable — after reading it, the reader should be able to do something and see a result.
The troubleshooting section at the end addresses common problems. This is incredibly valuable for SEO because people search for solutions to specific errors. If your tutorial ranks for “how to install wordpress” and also answers “wordpress installation blank white screen error,” you capture traffic from multiple search queries with a single piece of content. This is one of the most underused SEO strategies in tutorial content.
The “Next Tutorial” CTA at the bottom guides readers to continue learning. This keeps people on your site longer (reducing bounce rate and increasing session duration, both positive SEO signals) and strengthens your internal linking structure (helping Google discover and understand the relationships between your tutorials).
3.3 On-Page SEO Checklist for Every Post
Before you click the Publish button on any tutorial, run through this checklist. These are the non-negotiable SEO elements that should be present in every single post. None of these are optional if you want your content to rank well.
| SEO Check | What to Do | Why It Matters |
|---|---|---|
| Target keyword in H1 | Your main heading must include the primary keyword naturally, not forced | Tells Google the primary topic of the page |
| Keyword in first 100 words | Include the primary keyword early in your introduction paragraph | Reinforces relevance early in the content |
| Keyword in URL slug | Your post URL should contain the keyword separated by hyphens | URLs are a small but real ranking factor |
| Keyword in meta title | The SEO title should start with or include the primary keyword | The meta title is the most prominent element in search results |
| H2/H3 heading hierarchy | Use H2 for main sections, H3 for subsections. Never skip levels. | Helps Google understand content structure and hierarchy |
| Descriptive alt text on all images | Describe what each screenshot shows. Include keyword where natural. | Helps images rank in Google Images and improves accessibility |
| 3-5 internal links per post | Link to related tutorials on your site. Use descriptive anchor text. | Distributes page authority and helps Google crawl your site |
| External links to authority sources | Link to WordPress.org, official docs, or trusted references. | Shows Google your content is well-researched and credible |
| HowTo Schema markup | Add structured data for step-by-step tutorials using Rank Math | Enables rich snippets in Google with visible steps |
| Meta description with CTA | 150-160 characters, includes keyword, ends with action phrase | Improves click-through rate from search results |
Do you notice something about this checklist? Every single item on it also improves the reader’s experience. Alt text helps visually impaired visitors. Internal links help readers find more content. Clear headings help people scan your tutorial and find the section they need. A good meta description helps people decide if your page is worth clicking. When you optimize for humans, you naturally optimize for search engines. Keep that principle in mind and you will not go wrong with SEO.
Phase 4: Launch and Growth Strategy
Phase 4Your site is built. Your content is optimized. Now what? This is the phase where I see most beginners get stuck. They launch their site, check their traffic the next day, see zero visitors, and feel discouraged. They might even stop working on the site entirely. I do not want that to happen to you.
So let me set the right expectations right now. Launching is the beginning, not the finish line. Getting organic traffic from Google takes time — typically 3 to 6 months before you see meaningful results. That is not a reason to be discouraged. It is a reason to be consistent. Tutorial blogs have a natural advantage because they answer specific questions that people search for every single day. Your job in Phase 4 is to make sure Google knows your content exists, and then to actively promote it through multiple channels while you wait for organic traffic to build.
4.1 Pre-Launch Checklist
Before you tell anyone about your site — before you share it on social media, before you submit it to directories, before you tell your friends — make sure every item on this checklist is done. Skipping any of these can hurt your early rankings and make it harder to gain traction.
- Submit XML sitemap to Google Search Console — This is how you tell Google about all the pages on your site. Without this, Google relies on finding your pages through links from other sites, which can take weeks or months. With sitemap submission, Google usually starts crawling your site within days. Install Rank Math, generate your sitemap, go to Google Search Console, and submit the sitemap URL.
- Verify site in Bing Webmaster Tools — Bing has a smaller market share than Google, but it still sends meaningful traffic. Verification takes about 5 minutes. There is no reason not to do it.
- Test site speed (aim for under 2 seconds load time) — Use Google PageSpeed Insights to test. If your score is below 60, go back to Phase 1 and address caching, image sizes, and hosting quality. Speed affects both rankings and user experience.
- Check mobile usability in Google Search Console — This specific report shows if Google has found any mobile-specific problems on your pages, like text too small to read or clickable elements too close together.
- Set up Google Analytics 4 with MonsterInsights — GA4 tells you how many people visit, which pages they read, how long they stay, and where they come from. MonsterInsights is a free plugin that connects GA4 to your WordPress dashboard so you can see stats without leaving your site.
- Create social media profiles — At minimum, set up a Pinterest account. Pinterest is a visual search engine, not just social media. Tutorial pins can drive traffic for months after you create them. We cover Pinterest promotion in detail below.
- Prepare 5-10 pillar tutorials before launch — Do not launch with one or two posts. Have enough content that a new visitor can explore and find multiple useful articles. This increases the chance they will bookmark your site, subscribe, or return later.

4.2 Content Publishing Schedule
Let me ask you something. What is better: publishing seven rushed tutorials in one week, or publishing two well-written tutorials per week for a month? The answer is clearly the second option. Consistency beats volume every time. Search engines reward sites that publish regularly. Readers trust sites that have a steady flow of new content. But neither of those benefits work if the quality drops.
Writing a good tutorial takes real time. You need to test each step yourself, take clear screenshots, write clear explanations that a beginner can follow, and optimize everything for SEO. If you try to publish every day, you will not have time to do all of that properly. The result will be thin, low-quality content that does not rank and does not help anyone.
| Timeline | Action | Details and Reasoning |
|---|---|---|
| Week 1-4 | Publish 2 tutorials per week | Focus entirely on “Zero Level” basics. Cover the absolute fundamentals. Build your core content base. |
| Month 2 | 1 intermediate tutorial per week + update old posts | Start adding depth. Also go back to your first posts and improve them based on what you learned about writing better tutorials. |
| Month 3 | Launch email series: “7-Day WordPress Jumpstart” | Repurpose your best beginner content into a structured email course. This builds your email list, which becomes a traffic asset you own. |
| Ongoing | Update tutorials every 6-12 months | WordPress updates regularly. Screenshots become outdated. Steps change. Keeping content current builds trust and maintains rankings. |
Here is something important to understand about the “update old posts” part. Google prefers fresh content for many queries, especially how-to and tutorial queries where accuracy matters. When you update an old tutorial — replacing outdated screenshots, adding new steps, fixing broken links — you can update the “last modified” date. Google often gives a small ranking boost to recently updated content. This means updating old content can be just as valuable as publishing new content. Do not neglect your older posts.
4.3 Promotion Tactics That Work for Tutorials
Writing great content and waiting for Google to find it is a slow strategy. You can speed things up by actively promoting your tutorials through multiple channels. Here are four promotion methods that work specifically for tutorial content, and I want to explain each one in enough detail that you can actually use them.
Pinterest is the biggest opportunity for tutorial blogs. Most people think of Pinterest as a place for recipes and home decor. But Pinterest is actually a visual search engine. People search for “wordpress tutorial” on Pinterest just like they search on Google. When you create vertical pins (called Pins) for each tutorial, those pins can appear in Pinterest search results and drive traffic to your site. The key is to make your pins visually clear — show a before and after result, highlight a key step with a circle or arrow, and include text on the image that describes what the pin is about. Use keyword-rich descriptions because Pinterest search reads those descriptions. Each pin can drive traffic for months, sometimes years, after you create it.
Internal linking builds learning paths. I mentioned this in Phase 3, but it deserves extra emphasis here because it is both an SEO strategy and a promotion strategy. Every tutorial should link to 3-5 related tutorials on your site. This does two things at once. For the reader, it helps them discover more content without leaving your site, which keeps them reading longer. For Google, it helps the search engine understand how your content is connected, which boosts your topical authority. The specific strategy is to build “learning paths” — link from basic tutorials to intermediate ones, and from intermediate to advanced. A reader who starts at your first beginner tutorial should be able to click through a chain of internal links all the way to your most advanced content.
Community engagement brings real, qualified traffic. Find places where people ask WordPress questions — Reddit communities, Facebook groups, WordPress support forums, Quora. When someone asks a question that one of your tutorials answers, provide a helpful response and link to your tutorial. The critical rule here is: provide real value first. Do not just drop a link and run. Write a helpful answer that stands on its own, then add “I wrote a full tutorial about this if you want more detail” with your link. This approach gets your links clicked, brings targeted traffic, and builds your reputation in the community.
Repurpose content to reach more people across platforms. One tutorial can become many pieces of content. Take the key steps and turn them into a 60-second YouTube Short. Extract the main points and post them as a Twitter thread. Turn the troubleshooting section into a standalone Pinterest infographic. Create a PDF checklist or cheat sheet from the steps and offer it as a content upgrade for email subscribers. One hour of writing can become 5-6 pieces of content across different platforms, each one driving traffic back to the original tutorial on your site.
Phase 5: Measure and Optimize
Phase 5You have launched. You are publishing consistently. You are promoting your content. Now you need to answer the most important question of all: is any of this actually working? Phase 5 is about tracking the right numbers and making smart decisions based on what those numbers tell you.
But before we dive into specific metrics, I need you to understand something that separates successful site owners from frustrated ones. Not all numbers matter equally. Vanity metrics like total pageviews, number of social media followers, or your Alexa rank feel good to look at but do not actually tell you if your tutorials are helping people. Focus on metrics that show real engagement and real learning progress. Those are the numbers that lead to growth.
5.1 Key Metrics to Track
These are the five metrics I want you to watch. Each one tells you something specific about how well your site is performing.
Organic traffic (Google Search Console) — This is the number of people who found your site through search results. Not social media, not direct links, not paid ads — organic search traffic. This is the most important traffic metric because it is sustainable. Social media traffic spikes when you post and drops the next day. Organic traffic compounds over time as more of your pages rank and climb higher in results. Check this in Google Search Console under the Performance report. Look at both total clicks (how many people visited) and impressions (how many times your pages appeared in search results, whether clicked or not).
Average time on page (aim for 4+ minutes for tutorials) — This metric tells you if people are actually reading your tutorials or leaving quickly. For educational content, a high time on page is one of the strongest signals that your content is useful. If someone spends 5 minutes on your tutorial, they are reading it, following the steps, and getting value. If the average is under 1 minute on a long tutorial, something is wrong — maybe your writing is hard to follow, maybe the page loads slowly, or maybe the content does not match what people expected from the search result. You can find this metric in Google Analytics 4 under Engagement, then Pages and Screens.
Bounce rate (under 60% is good for educational content) — Bounce rate means the percentage of people who left your site after viewing only one page without any interaction. For tutorial blogs, some bounce is normal and expected. Someone searches for “how to change wordpress admin email,” finds your tutorial, follows the steps, solves their problem, and leaves. That is a successful visit even though it counts as a bounce. But if your bounce rate is above 80%, it usually means a problem — your content does not match the search intent, your page loads too slowly, or your design is confusing on mobile.
Keyword rankings for target terms — Track where your tutorials rank in Google for their target keywords. You can do this in Google Search Console (look at average position for your pages) or with a dedicated rank tracking tool. Watching your rankings move from page 5 to page 3 to page 1 is incredibly motivating. It also tells you which tutorials are gaining momentum and which ones might need improvement. Focus on getting your tutorials from page 2 to page 1 — that is where the biggest traffic jump happens because most people never click past the first page of results.
Comments and questions from readers — This is a qualitative metric, not a number on a chart. But it might be the most valuable signal you have. When people leave comments asking questions about your tutorial, it means they read it, tried to follow it, and were engaged enough to take action. It also gives you direct insight into what people are confused about, which gives you ideas for new tutorials or improvements to existing ones. A tutorial with 15 thoughtful comments is often more valuable than a tutorial with zero comments but slightly more pageviews.
5.2 Monthly Optimization Routine
Once per month, set aside 2 to 3 hours to go through this specific routine. This is how you turn a good site into a great one over time. Each step is actionable and directly contributes to better rankings or better user experience.
Review your top 5 performing tutorials and plan follow-ups
Open Google Search Console and sort your pages by clicks. Look at your top 5 pages. These are the tutorials that Google already trusts enough to send traffic to. Now ask: can I create a follow-up tutorial that goes deeper on this topic? If “How to Install WordPress” is your top post, write “How to Fix Common WordPress Installation Errors.” If “How to Set Up WordPress SEO” ranks well, write “Advanced WordPress SEO: Schema Markup and Core Web Vitals.” Follow-up content to proven winners has a much higher chance of ranking quickly because Google already sees your site as relevant to that topic.
Update outdated screenshots in older tutorials
WordPress updates its interface several times per year. The dashboard you see today might look different from what it looked like 6 months ago. If your tutorial screenshots show an old version of the interface, readers will get confused. They will see buttons in different places, menus with different labels, and settings that do not match what they see on their own screen. Go through your older tutorials and replace any screenshots that no longer match the current WordPress version. This is tedious work, but it keeps your content accurate and builds massive trust with readers.
Find and fix broken links
Use a broken link checker plugin to scan your site for links that lead to 404 error pages. Broken links hurt you in two ways. For readers, clicking a link and finding a “page not found” error is frustrating and makes your site look abandoned. For SEO, broken links waste the authority that those links were passing to other pages. Fix broken internal links by updating the URL. Fix broken external links by finding an alternative resource or removing the link. This is especially important for internal links between your tutorials — a broken internal link means a reader cannot follow your learning path.
Add new internal links from recent posts to older content
When you publish a new tutorial, go back to your older related posts and add links pointing to the new one. For example, if you just published “How to Use the WordPress Block Editor,” go to your older post “How to Create Your First WordPress Post” and add a link to the new block editor tutorial. This helps the new post get discovered faster by both readers and Google’s crawler. It also strengthens your internal linking structure over time, which is one of the most powerful SEO signals for building topical authority.
Refresh meta descriptions for pages with good rankings but low clicks
In Google Search Console, look at your pages that have a high average position (meaning they rank well) but a low click-through rate (meaning people see your result but do not click it). This usually means your meta description is not compelling enough. Rewrite it. Add a specific benefit. Include a number if possible. End with a clear reason to click. For example, change “Learn about WordPress permalinks” to “Learn how to set up WordPress permalinks in 2 minutes. Step-by-step guide with screenshots.” The second version is much more likely to get clicked.
Bonus: Your Full Zero to Hero Content Roadmap
Throughout this guide, I have referred to a structured learning path from zero level to hero level. Now I want to give you the complete content roadmap — every tutorial topic organized by level. This is the actual syllabus for your WordPress learning journey. Each item here is a tutorial you can create, and together they form a complete curriculum that takes someone from absolute beginner to advanced practitioner.
Zero Level (Beginner)
These tutorials assume zero prior knowledge. If someone has never heard of WordPress before, these are the first articles they should read. Every concept is explained from scratch with no assumptions.
- What is WordPress? — A complete beginner guide that explains what a CMS is, the difference between WordPress.com and WordPress.org, how WordPress works behind the scenes, and why it powers over 43% of the web.
- How to Install WordPress — Covers three installation methods: one-click install through hosting, manual installation through FTP, and local installation for practice. Each method explained with screenshots.
- Understanding the WordPress Dashboard — A visual walkthrough of every menu item in the admin sidebar. What each section does, which settings matter most, and which ones beginners can ignore for now.
- Creating Your First Post and Page — The difference between posts and pages (this confuses every beginner), how to use the block editor, adding text formatting, inserting images, setting featured images, and publishing.
- Choosing and Installing a Theme — How to browse the theme directory, preview themes, install and activate them, and use the customizer to change basic settings like colors and fonts.
Building Level (Intermediate)
After mastering the basics, readers are ready to customize their site and add real functionality. These tutorials bridge the gap between beginner and advanced skills.
- Customizing Themes with the Block Editor — Using the site editor to modify headers, footers, and page templates. Working with block patterns and template parts.
- Essential Plugins Every Blog Needs — Which plugins to install, how to configure each one, how to avoid plugin conflicts, and how to test if a plugin is slowing down your site.
- Basic SEO Setup for WordPress Blogs — Installing Rank Math, writing meta titles and descriptions, setting up an XML sitemap, understanding what schema markup does.
- Creating Custom Menus and Widgets — Building navigation menus with dropdowns, adding widgets to sidebars and footer areas, organizing the site structure for easy navigation.
- Managing Users and Permissions — Understanding the five default user roles (Administrator, Editor, Author, Contributor, Subscriber), when to give access to other people, and security best practices for user accounts.
Hero Level (Advanced)
These tutorials are for learners who want genuine technical skills. This is where you separate yourself from casual WordPress users and gain abilities that have real market value.
- Creating Custom Post Types — How to register custom post types using code or a plugin. When to use them (portfolios, testimonials, products) and how they differ from regular posts and pages.
- Child Theme Development Basics — Why editing a parent theme directly is dangerous, how to create a child theme, and how to safely add custom CSS and PHP modifications.
- Advanced SEO: Schema, Core Web Vitals, Technical SEO — Adding structured data for rich snippets, optimizing for Largest Contentful Paint and Cumulative Layout Shift, conducting a technical SEO audit.
- Performance Optimization Deep Dive — Advanced caching strategies, database query optimization, critical CSS generation, lazy loading, CDN setup, and server-level optimizations.
- Monetizing Your WordPress Blog — Google AdSense placement strategy, affiliate marketing best practices, selling digital products, and when to add monetization without hurting user experience.
Projects Level (Apply Your Skills)
The best way to learn is by building real things. These project-based tutorials let readers apply everything they learned in a practical context.
- Build a Personal Blog in 1 Hour — A timed project that walks through setting up a complete, functional blog from scratch. Proves to the reader that they can build something real.
- Create a Tutorial Site Like This One — Building an educational WordPress site with proper category structure, tutorial templates, table of contents, and internal linking.
- Launch a Membership WordPress Site — Setting up paid content areas, member registration and login, access control based on membership level, and payment integration.
- Migrate WordPress Sites Safely — How to move a WordPress site from one hosting company to another, or from a local development environment to a live server, without breaking anything.
Quick Start Actions for Today
Okay, class. We have covered a lot of ground here. I have given you the complete roadmap across all five phases. But here is the thing — a roadmap is useless if you never start walking. So I want to give you five specific actions you can take today, right now, to start moving forward.
Install Rank Math and run the setup wizard
If you already have WordPress installed, go to Plugins, click Add New, search for “Rank Math,” install it, and activate it. Click the “Start the Wizard” button that appears. The wizard will guide you through connecting Google Search Console, enabling sitemaps, setting up basic SEO settings, and configuring schema markup. The entire process takes about 15 minutes and gives you an immediate SEO foundation. Even if you do nothing else today, do this one thing.
Create your first pillar post using this roadmap
Write a post titled “WordPress Tutorial Roadmap: Zero to Hero in 2026.” Use this guide as your source material. Structure it with the five phases, link out to each tutorial as you create them, and make it the hub page that connects all your future content. Even if you only have this one post published, having a clear roadmap page shows visitors (and Google) that you have a structured plan, not just random articles.
Set up Google Search Console and submit your sitemap
Go to search.google.com/search-console. Click “Add Property.” Choose “URL prefix” and enter your site URL. Verify ownership using the Rank Math plugin (Rank Math has a one-click verification method). Then go to Sitemaps, enter your sitemap URL (usually yoursite.com/sitemap_index.xml), and click Submit. This tells Google your site exists. Without this step, you are invisible.
Design your reusable tutorial template
Open the WordPress block editor. Create a “What You Will Learn” box using a group block with a colored background. Create a “Next Tutorial” CTA box using another group block. Save both as reusable blocks. Now, every time you start a new tutorial, you can insert these pre-designed blocks in one click. Having a consistent template saves you hours of formatting time over the course of writing dozens of tutorials.
Batch-write your first three beginner tutorials
Choose three topics from the “Zero Level” list above. Sit down and write all three in one session. Writing in batches is more efficient than writing one at a time because you get into a flow state and do not have to switch between “writing mode” and “planning mode” repeatedly. Having three tutorials ready at launch means visitors can explore your site and find enough content to take you seriously.
Ready to start your WordPress journey? This roadmap is your complete guide from zero to hero. Bookmark this page, follow the phases in order, and take action on each step. If you ever get stuck or have a question about anything covered here, leave a comment below. I read and reply to every single comment. Let’s build something great together, one tutorial at a time.
Frequently Asked Questions
It depends on how much time you spend each week. If you practice 10 to 15 hours per week and follow the phases in order, you can reach a solid intermediate level in about 3 months. Reaching the advanced “hero” level takes 6 to 12 months of consistent learning and building real projects. The key is consistency. Studying two hours every week is far more effective than cramming for 14 hours one weekend and then not looking at WordPress for a month.
I do not recommend it. Each phase builds directly on the previous one. If you skip the technical foundation in Phase 1 and jump to advanced SEO in Phase 3, you will run into problems with site speed, indexing errors, and schema markup that you do not know how to fix because you never learned the basics. If you skip design fundamentals in Phase 2 and try to build complex layouts in Phase 4, your site will be messy on mobile. If you already know some of the material in earlier phases, skim through it quickly. But do not skip entire phases.
No. Every tool and plugin recommended in this roadmap has a free version that is sufficient for beginners. Rank Math Free, LiteSpeed Cache Free, Smush Free, UpdraftPlus Free, and Table of Contents Plus Free together give you everything you need. Premium versions add extra features and convenience, but they are not required to learn WordPress or to build a successful tutorial site. Start with free tools. Invest in premium versions later when you have a clear reason to upgrade.
Most WordPress guides are either too shallow (listing tips without explaining why they matter) or too random (jumping between unrelated topics). This roadmap is different because it is a structured 5-phase system where each phase builds on the last. It covers technical foundation first, then design, then SEO, then growth, then optimization — in the exact order you need them. It also includes a complete content syllabus from zero level to hero level so you always know what to learn next and never feel lost.
Yes. Tutorial sites earn money through display ads like Google AdSense, affiliate marketing by recommending hosting and tools, and email marketing by building a subscriber list and promoting relevant products or courses. The SEO and content structure taught in this roadmap are specifically designed to build organic traffic over time, which is the foundation for all of these monetization methods. Focus on creating genuinely helpful content first. Once your traffic reaches a steady level, monetization follows naturally.
Leave a comment on the specific tutorial where you are stuck. Describe what you have done, what you expected to happen, and what actually happened. Include your WordPress version if you know it and any error messages you see. I read every comment and reply with specific help. You can also search Google for the exact error message — because WordPress is so popular, almost every error has been solved and documented by someone in the community already.
Start with a local install using a tool like LocalWP for the first few tutorials in Phase 1. This lets you practice without worrying about breaking a public site. But by the time you reach Phase 3 and start focusing on SEO, you need a live site because Google cannot index a local install. The ideal approach is to practice basics locally, then set up your live site with proper hosting and continue the roadmap there. We cover local installation and live installation as separate tutorials in this series.